Sunday, July 24, 2011

Some ramblings on the FoxPro Class Browser

Some time ago, I delved into the Class Browser, to extract and modify the code that allows you to drag the icon at the top left of the form and drop an instance of a class elsewhere.  (This was done more in the way of a challenge than anything else.).  I was able to do so; see Open Files

Then this last week, there was a UT thread that had to do with adding objects to columns, and I learned that there were other good suggestions on how to do this, but not using the Class Browser.  (I learned that you can do so by first selecting an object already in the column, and then dragging onto that column creates a sibling. -- but this seems quite cumbersome, and difficult to remember.)

Since I already had visited that same code and plunked it into PEM Editor, I took a look at it and found that there was an easy fix to allow dropping objects into a grid column.  Very easy in fact -- modifying exactly one line of code to include 'column' in the same list as 'container' and 'page'.

And this was enough to whet my appetite.

I have now made a few modifications to my own copy of the Class Browser:
  1. Problem with not being able to drag/drop objects into a column has been resolved.
  2. You can now drag an object onto the PEM Editor form, and the object will be added as a child or sibling of the currently selected object as displayed in the PEM Editor form.  This means you can select a column in a grid, or possibly a container that is obscured by other objects, and be able to safely drag/drop.  (You can drop it anywhere on the PEM Editor form.)
  3. The object dropped onto the form is now selected in both the Property Window and PEM Editor.
  4. Classes that are opened (double-clicking) now use (if available) the standard code available thru Thor for opening files.  See Managing MRU lists and Source Code Control.  
These are all minor changes, actually, with very very little code written.

I've been thinking about what else I might be able to accomplish.  (I like tinkering, this is how PEM Editor started).  So, some ideas:
  1. I find the organization of the TreeView to be all a jumble, not taking advantage of all that TreeViews offer.  I think that having root nodes that are the baseclasses, so that all the classes with the same baseclass would be grouped, would be a vast improvement.
  2. Unless I have it wrong, there does not seem to be a way to include all the classes in a project.  I would think that would be highly desirable.  (Apparently, adding a project adds ALL the files.  No doubt there is (was?) good reason for this, but I would think that in a class browser there should be some way to show just the classes.)
  3. I am seeing an occasional bug where the icon for some nodes is not shown.  I'd like to fix that.
  4. Is there really no way to drag a class directly from the TreeView node, without having to resort to using that obscure icon?
I have no idea which of any of these I will implement.  And, I wonder if there are other good ideas out there that I am not aware of.

Recent Beta releases of Thor and PEM Editor

With the releases to Beta of both Thor and PEM Editor over the last two weekends, I have moved ever closer to getting them ready to go to production.

The big stumbling block had been documentation, but that is now done -- there is is complete on-line documentation for both, see Thor Help and PEM Editor IDE Tools Help.  (Note that you can get to the individual page for one of the IDE Tools from with Thor, on the second page of the pageframe).

There are in fact lots of neat features here that had been 'hidden' previously, mainly because there was no way to learn of them.  They are now discoverable, at least for those who browse the various pages.

Two I would like to point out:

(1)  There is a small block of code that you can paste into one method in your ProjectHook class that will have a variety of benefits; see Managing MRU lists and Source Code Control.  It is not what you might think, easy enough to install, and should not interfere with anything you are already doing.

(2)  There has been a tool for some time that provides a different mechanism for finding classes; see Open Files.  Note that there is an icon in the upper left corner here which allows you to drag the currently selected class in the grid and drop it onto the form you are editing -- or, and this is brand new, you can drop it onto the PEM Editor form itself, which will cause it to be added to whatever object is currently displayed in PEM Editor. 

(There are distinct benefits to this if, for instance, the container you want to drop this on into is obscured by other objects.)

This last item has caused me to expand my interests a bit, to include the Class Browser.  More on that in a bit.

Friday, June 3, 2011

PEM Editor 7 with IDE Tools and THOR released on VFPx

I've finally gotten all the pieces together to release both PEM Editor 7 and THOR on VFPx, in Beta releases.

What's new in PEM Editor 7 is that there is now a large suite of tools included with it, and they can be used independently from the PEM Editor form. Some of these tools were in previous releases (but with significant improvements), but most are new.

There's a lot in this release that is brand new, things that have never been available in FoxPro before. Unlike PEM Editor proper, which advertises itself as a replacement for five different FoxPro dialogs, meaning that it provides a better, cleaner way of doing something you could do before, the new IDE Tools let you do things that you could not do before.

PEM Editor is no longer in the business of managing how these new tools are accessed, whether it be by context menu or hot key. That is now handled by the new tool THOR.

The original idea behind THOR was to have an independent mechanism for handling the tools from PEM Editor (hot keys, pop-up menus, modifications to the VFP system menu, etc.) This has evolved to include facilitating the creation of tools by individual developers and the creation of a repository for sharing new tools.

It's good to finally get this out the door, so that a much larger audience can start using these tools and commenting on them.

Tuesday, February 15, 2011

PEM Editor tip: Group filter (new feature)

This is a new feature in version 6.50.

A new option, 'Groups' has been added in the Filter section. This feature is modelled after the 'Layout', 'Data', and 'Other' tabs in the Property Sheet.


Customization

The list of groups and the items in each group may be customized. There are two tables, GroupNames and PEMNameGroups, which can be copied from the 'Sample Plug-Ins' folder into the 'Live Plug-Ins' folder and modified as follows:
  1. You can create new groups by adding records to GroupNames. (One new group is already created in the file). You can also change the order of display by setting the values in the field {DisplayOrd}
  2. You can identify the items in the new group, or add records to the pre-defined system groups, by adding records into PEMNameGroups. The names are not case-sensitive and may appear in more than one group.
  3. You can remove records from the pre-defined system groups by adding a record into PEMNameGroups and setting the {Removed} flag

Saturday, February 12, 2011

PEM Editor tip: the Tools object (_oPEMEditor.oTools)

This is a new feature in version 6.50.

The object _oPEMEditor.oTools, documented here, contains a number of useful tools which may be of value either in customizing PEM Editor or for use in other tools.

Note that the PEM Editor form need not be open for these tools to work.

Methods (Parameters)Description
AddMRUFile (tcFileName, tcClassName) Adds a file to its appropriate MRU list (in the FoxPro resource file). If the file is a class library, but no class name is supplied, adds the file to the MRU list for class libraries (unique to PEM Editor)
CloseForms() Close the PEM Editor and Document TreeView forms, if open
CreateNewPEM (tcType, tcName, txValue) Creates a new property or method:
tcType = 'P' for Property, 'M' for Method
tcName = Name for new PEM (_MemberData if appropriate
txValue = Value (for properties) or method code (for methods)
CloseForms() Close the PEM Editor and Document TreeView forms, if open
DiskFileName (tcFileName)Returns the file name as it is stored on disk (that is, with current upper/lower case).
EditMethod (toObject, tcMethodName)Opens a method (or event) for editing. {toObject} may be an object reference, .T. for the current form or class, or empty for the current object.
EditSourceX (tcFileName, tcClass, tnStartRange, tnEndRange)Opens any file for editing (as EditSource does), with additional capabilities:
The file is added to its appropriate MRU library.
The file is opened with the correct case for the file name, so that when it is saved the case for the file name will not be changed.
If the file is a class library, and no class name is supplied, the class browser is opened.
You will be asked whether you want to check out the file from Source Code Control (if you use SCC and you have marked the appropriate item in the Preferences file.)
FindObjects (tcSearchText)Finds all objects matching the search criteria in {tcSearchText}. The search criteria are the same as are specified by the 'Find' (binoculars) search button. The result is a collection, where each item in the collection is an object with two properties:
Object - a reference to the object
FullObjectName - the full path name to the object
For example, .FindObjects ('Exists ("ControlSource")' ) returns a collection of all objects having a ControlSource.
FindProcedure (tcName)Finds a PRG named {tcName}, or a procedure or function named {tcName} within a PRG, or a constant named {tcName}, opens the file for editing, and highlights the searched-for name.
GetCurrentObject (tlTopOfForm)Returns the currently selected object or form/class
GetPEMList (toObject, tcTypes)Returns a collection of the names of PEMs for an object. {toObject} may be an object reference, .T. for the current form or class, or empty for the current object. {tcTypes} may be one or more of 'P' (for properties), 'E' (for Events), or 'M' (for Methods); or, if empty or missing, the collection will contain all PEMs.
GetMRUList (tcName)Returns a collection of file names in a MRU list. {tcName} may be a file name, a file extension, or the actual MRU-ID (if you know it)

Sunday, February 6, 2011

PEM Editor tip: the EditorWindow object (_oPEMEditor.oEditorWin)

This is a new feature in version 6.50.

All of the IDE features of PEM Editor use the functions from FoxTools.fll to access and modify the currently open editing window. Recognizing that these tools may be of value to those who wish to customize PEM Editor (such as when creating Dynamic Snippets) or for other uses, the object _oPEMEditor.oEditorWin is documented here.

The methods in this object serve two purposes:
  1. As wrappers for the function in FoxTools
  2. To simplify the task of identifying the currently open editing window.
Editing windows are identified by a numeric value called a handle. All of the IDE features in PEM Editor first call _oPEMEditor.oEditorWin.FindWindow(), which determines the handle for the currently open window and saves it. Thereafter, all of the other methods of this object refer to this saved window handle so that it need not be explicitly referenced in their parameters. Some further notes:
  1. Character positions and line counts start at 0, not 1. (i.e., be careful)
  2. There is full documentation for the functions in FoxTools.fll available. In the Source folder, execute
  3. The PEM Editor form need not be open for these tools to work.


Window manipulation: handles, size, position, title, etc.
Methods (Parameters) Description
CloseWindow() Close the current window
FindLastWindow() Returns the handle of the most recently used window which is either of a PRG or method code from the Form or Class Designer.
FindWindow() Saves the handle for the currently active window, and returns its window type:
0 – Command Window, Form and Class Designers, other FoxPro windows
1 – Program file (MODIFY COMMAND)
2 – Text Editor (MODIFY FILE)
8 – Menu code edit window
10 – Method code edit window of the Class or Form Designer
12 – Stored procedure in a DBC (MODIFY PROCEDURE)
-1 - None
GetHeight() Returns the height of the editing window, in pixels.
GetLeft() Returns the left position of the editing window, in pixels.
GetOpenWindows() Returns a collection of the handles of all open windows, most recently used first.
GetTitle() Returns the title for the current window
GetTop() Returns the top position of the editing window, in pixels.
GetWidth() Returns the width of the editing window, in pixels.
GetWindowHandle() Returns the handle of the current editing window
MoveWindow (tnLeft, tnTop) Moves the editing window to position {tnLeft}, {tnTop}. Both are in pixels.
ResizeWindow (tnWidth, tnHeight) Resizes the editing window to {tnWidth} by {tHeight}. Both are in pixels.
SelectWindow (tnHandle) Selects (brings to the foreground) window with handle {tnhandle}
SetHandle (tnHandle) Sets the handle (used to indicate the window being referenced in most of these commands/)
SetTitle (tcNewTitle) Sets the title for the editing window to {tcNewTitle}

Text manipulation
Methods (Parameters) Description
Copy() Copies the currently highlighted text into the clipboard
Cut() Cuts the currently highlighted text
EnsureVisible (tnPosition, tlScroll) Ensures that the character at position {tnPosition} is visible in the editing window. If {tlScroll} is true, it is brought to the mid-point of the editing window
GetCharacter (tnPosition) Returns the character at position {tnPosition}
GetEnvironment {tnIndex} Returns a single environment setting. {tnIndex} takes values from 1 to 25. See _EdGetEnv in the help for FoxTools for a description of all the settings. Frequently used values are:
2 – File Size
17 – Selection start
18 – Selection end
25 – Window Type (see above)
GetFileSize() Returns the file size
GetLineNumber (tnSelStart) Returns the line number for the character at position {tnPosition}
GetLineStart (tnSelStart, tnLineOffset) Determines the line number for the character at position {tnPosition} and returns the position for the character at the beginning of that line. If {tnLineOffset} is supplied, it first offsets the line number by that amount. Thus .GetLineStart (tnSelStart, 1) gives the start position of the next line after the line for {tnSelStart}
GetSelEnd() Returns the position for the end of the currently highlighted text
GetSelStart() Returns the position for the start of the currently highlighted text
GetString (tnSelStart, tnSelEnd) Returns the string of characters from position {tnSelStart} through {tnSelEnd}
Paste() Pastes the contents of the clipboard into the editing window
Select (tnSelStart, tnSelEnd) Selects (highlights) the string of characters from position {tnSelStart} through {tnSelEnd}
SetInsertionPoint (tnPosition) Sets the insertion point to {tnPosition}

Saturday, January 22, 2011

PEM Editor tip: Go To Definition (Enhanced!)

'Go To Definition', introduced in Version 6.00, has been significantly enhanced in Version 6.50.

The 'things' for which you can 'Go To Definition' have gone beyond the original list of methods, properties, and objects to include creating new methods and properties, and finding PRGs, procedures, and functions, defined constants, classes, forms, and parent code. There is also a provision for customization using plug-ins.

The mechanics are simple:
  • Click on the name of the 'thing' (you can highlight it, if desired, but that is not necessary).
  • Initiate "Go To Definition", either by using the PEM Editor menu (in the VFP Main Menu) or by using the Hot Key (which you can assign in the Preferences form).

Note that Go To Definition will work in method code, PRGs, and also the Command Window.

Methods, Objects, and Properties
  • For methods, it will open up the method for editing, if there is custom code; otherwise it will open up a window showing all the parent code for the method.
  • For objects, it will act as if you selected the object in the form or from Document TreeView.
  • For properties, it will act as if you selected the object in the form or from Document TreeView and then highlights the property in the grid.
In the example below, the cursor is within the method name 'GridToExcelValue', and invoking 'Go To Definition' will bring up the code for that method.


Notes:

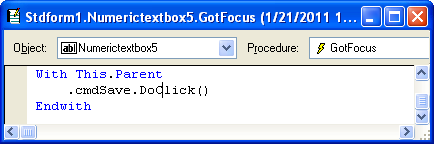
In the example below, the WITH/ENDWITH construction is analyzed so that the definition being searched for is actually This.Parent.cmdSave.DoClick.  This analysis will include embedded WITH/ENDWITH constructions.

However, VFP does not provide any way to know what 'THIS' refers to in a editor window; that is, there is no information available that gives a reference to the object that the method is attached to. Thus, PEM Editor changes the title bar of any method that it opens in anticipation of any use of Go To Definition.


Finally, there is no way to determine what object is referred to by code like  loObject.Refresh(). Thus, at times, the wrong definition may be shown.

Creating New Methods or Properties

If the search for the property, method, or object was unsuccessful, you will then be prompted about whether you want to create a new property or method. This allows you to do so, using only a few keystrokes, without leaving the method you are editing.

Consider this example, when creating the first few lines of the Init method for a form:


Using Go To Definition pops up the following form:


Note that this is a direct but not necessarily complete way of adding properties or methods.  If you want to change the default value of the property, set the description, etc, you will still have to use the normal method of doing so; of course, you can still use this technique and come back to edit the property or method later.

PRGs, Procedures, Functions

In the sample code below, 'OpenTable' could be a PRG, or a procedure or function within a PRG; In any of these cases, Go To Definition will open the PRG for you (and, if it's a procedure or function within a PRG, will highlight the line where the definition starts).


Defined Constants

Similarly, selecting a name of a defined constant (created by #Define), whether the definition occurs in the current code or in (nested) #include files, will find and highlight that definition.

Note that for all of these possibilities, the active project, if any, is searched, along with the current path and settings for 'Set Procedure' and 'Set ClassLib', as appropriate

Thanks to Doug Hennig for idea for finding PRGS, procedures, functions, and constants, and also providing the code to implement it!

Classes

Using Go To Definition on either NewObject of Createobject will open the class named in the parameters that follow.  In the example below, using Go To Definition on 'NewObject' would open class 'ParameterX'; using it on 'CreateObject' would use it on class 'clsUpdateFoxCode'.


Forms

Using Go To Definition on the name of a form (that is, following 'Do Form') will open that form for editing..


Parent Code (DoDefault)

Using Go To Definition on DoDefault will open up a window showing all the parent code for the current method.

Customization Using Plug-Ins

If none of the searches described above are successful, PEM Editor will look for a plug-in which can do its own search for the selected 'thing'. It looks first for a file named PEME_GoToDefinition.PRG anywhere in the path. If this fails, it then looks for a file named GoToDefinition.PRG in the 'Live Plug-Ins' folder. (There is a commented sample GoToDefinition.PRG in the 'Sample Plug-Ins' folder, which can be copied to the 'Live Plug-Ins' folder and modified).

The PRG is called with three parameters -- the text being searched, the text (on the same line) preceding the text being searched for, and the text (on the same line) following the text being searched for. The PRG can then do, well, just about anything -- bring up a form, open a table, modify the code in the method, etc.

The sample, for instance, will assume that the text being searched for is a name, either of a cursor, table, or class.  If an alias by that name is already in use, it will open a form which has a browse window and a grid showing the table structure; or, if a table by that name exists, it will open the table and show the same form; or, finally, it will attempt to open and edit a class by that name (using one of the methods from _oPEMEditor.oTools -- a set of tools, soon to be documented, that is also part of this release).

(I welcome comments about other inventive uses for this plug-ins.)

Tuesday, January 18, 2011

PEM Editor Version 6.50 Alpha released

Version 6.50 of PEM Editor is now ready for testing; download it from   PEM Editor Version 6.50 Alpha 11

This version has already undergone considerable testing, and the expectation is that it will be released as a Beta version on VFPx within three to four weeks.

In the meantime, the remaining new features will be documented in this blog, and work will begin on creating the necessary documentation for its release on VFPx.

Enjoy!

Monday, January 17, 2011

PEM Editor tip: Cross References screen (new feature)

This is a new feature in version 6.50.

The Cross References screen (see sample below) creates an analysis of all of the 'names' referenced in a PRG, method, or collection of methods.  These names are broken down into about a dozen different categories;  the TreeView on the left provides for navigation between the categories and the names within each category, and the grid on the right shows where the names are referenced.  Double-clicking on a row in the grid opens the indicated method and highlights the relevant line of code.

Invoking the Cross References Screen

For PRGs and single methods, the Cross References screen is accessible either from the PEM Editor menu in the VFP Main Menu, or by using a hot key (assigned in the Preferences screen).

For forms and classes, the Cross References screen may be applied to all of the custom methods for a class or an object, or for an object and all of its child objects.  The option to do so is found in the right-click context menu for the combobox.


Analysis / Categories in the TreeView 

The Cross References screen breaks the 'names' referenced in code into about a dozen distinct categories.  The 'names' actually include extended names, so that references to objects ('This.lblName.SomeProperty') or tables ('Customers.Name') are treated as single references.  Furthermore, references within WITH/ENDWITH blocks are resolved to point to the object named in the WITH statement.  (This even applies to embedded WITH/ENDWITH blocks).

The categories and their definitions are:
  • Global Assignments - simple names that are assigned values, but are not locals or parameters
  • Global References - simple names that are referenced, but are not locals or parameters
  • Tables/Cursors - references to names in VFP statements that indicate a table or cursor
  • Fields - references to names in SQL-Select statements
  • Forms - Do Form .....
  • Procedures/Functions -Calls to PRGs, or procedures or functions within PRGs.
  • Methods - Calls to methods
  • Property Assignments - references to properties or objects that are assigned values
  • Properties/Objects - references to properties or objects that are not assigned values
  • Parameters
  • Locals
  • Constants - compiler constants (#Define ...)
Warranty Information: This categorization cannot be perfect -- it is only at run time that VFP itself can properly identify which category any name falls into.  While the first two and last three categories are completely reliable (global assignments and references, parameters, locals, and compiler constants), the remainder cannot be, and so there are instances where names will be reported in the incorrect category.  For instance, 'Customers.Name' certainly looks like a reference to a field in a table, but 'Customers' could (conceivably) actually be an object reference.

The Grid

The four columns may be moved or resized them as desired; their size and order will be remembered for next time.

The grid displays one record for each line of code that a name is referenced on.  If you double-click on one of the records, the method/PRG will be opened and the line of code will be displayed.

There is a possible point of confusion when references are to code that is created on continuation lines.  The analysis of code in this screen treats code on continuation lines as a single line of code.  Thus, double-clicking to a reference in the grid will always highlight the first line in a set of continuation lines, even if the actual reference is to a later line in that subset.

Customization

There is a right-click context menu for the TreeView that allows for some customization:
  • You can select which of the categories are automatically expanded when the screen is first opened.  (By default, all categories are collapsed).
  • You can select which single category is initially selected when the screen is first opened (causing the references to the items in that category to appear in the grid.

Tuesday, January 4, 2011

PEM Editor tip: Source Code Control

This is a new feature in version 6.50.

If you are using Source Code Control, there is now an item in the Preferences file that allows you to specify if you wish to check out files using Source Code Control.

Whenever you try to open a file using PEM Editor, whether from one of the MRU lists or from one of the Open dialogs, you will first be asked whether you want to check it out; if not, the file will be opened in read-only mode.